28 KiB
Tecnavia Newsmemory SDK Integration
This document describes how to integrate in your existing Xcode project the Tecnavia Newsmemory ePaper solution.
Table of Contents
System requirements
| Version | |
|---|---|
| Xcode | 14.0 or above |
| Minimum deployment target | iOS 15.1 |
Installation
If you are not using Cocoapods in your project, follow the instruction of the section 'Manual'
Cocoapods
Get the SDK via public repo
-
Add the following lines inside your target declaration in your
Podfile.Remember to add the source to our specs repo
...
source 'https://pubgit.newsmemory.com/tecnavia/newsmemory-ios-sdk-specs.git'
...

target '<YOUR_TARGET>' do

...

pod 'NewsmemorySDK', '3.32.04'

...

end
- If you are building locally, run
pod install. If you upgrade from a previous version of NewsmemorySDK runpod install --repo-update
Get the SDK thru zip file
Tecnavia provides you a zip package named ta-newsmemory-sdk_33204 (i.e. 33204, means that the SDK version is 3.32.04).
-
Unzip the package and copy the
ta-newsmemory-sdk_33204folder in the folder containing your project'sPodfilefile. -
Add the following lines inside your target declaration in your
Podfile.
...

target '<YOUR_TARGET>' do

...

pod 'NewsmemorySDK', path: 'ta-newsmemory-sdk_33204'

...

end
- Run
pod install.
Manual
Package contents
Tecnavia provides you a zip package named ta-newsmemory-sdk_33204 (i.e. 33204, means that the SDK version is 3.32.04).
Unzip the package and copy the ta-newsmemory-sdk_33204 folder in the folder containing your project's .xcodeproj file (i.e. the SDK folder must be at the same level of the project file).
The unzipped folder named ta-newsmemory-sdk_33204 has the following subfolders structure:
  .
  ├── Headers                                 # headers files imported by the .xcconfig file

  ├── Libraries                               # libraries imported by the .xcconfig file


  ├── Other                                   # images and resources to manually import in the project
      ├── assets                              # set of default icons/images used by the ePaper
      ├── Resources
          ├── fonts                           # set of base fonts supported by the ePaper (*.otf, *.ttf files)
          ├── Newsmemory.js                   # the minified javascript bundle file, core of Tecnavia ePaper solution
          ├── AccessibilityResources.bundle   # a bundle required by React Native framework
  ├── ta-newsmemory-sdk.debug.xcconfig        # the .xcconfig file with debug settings
  ├── ta-newsmemory-sdk.release.xcconfig      # the .xcconfig file with release settings
  ├── LICENSE
  └── README.md
  └── img									  # set of images for the README file
- Drag the
assetsinsideOtherfolder and drop it in the project navigator. - Select
'Create folder references'option
- Drag the
ResourcesinsideOtherfolder and drop it in the project navigator. - Select
'Create groups'option
- Drag and drop
ta-newsmemory-sdk.debug.xcconfigandta-newsmemory-sdk.release.xcconfigin the project navigator - Select
'Create groups'option - Select your project in the project navigator and select
Info - Under
Configurationsexpand theDebugline and select your Target - Click on
Noneand selectta-newsmemory-sdk.debug.xcconfig - Do the same for the
Releaseconfiguration this time selecting theta-newsmemory-sdk.release.xcconfigconfiguration file.
- if your project already includes a
.xcconfigfile for your target configuration add this line at the end of the file
- your-debug-xconfig-file.xcconfig
...

#include "ta-newsmemory-sdk.debug.xcconfig"
- your-release-xconfig-file.xcconfig
...

#include "ta-newsmemory-sdk.release.xcconfig"
Changes to the Info.plist
Fonts
In order to make ePaper fonts available inside your app you'll need to add the font file name lines to your app's Info.plist.
The key were to add the font names is UIAppFonts
 <key>UIAppFonts</key>
	<array>
		<string>Roboto_medium.ttf</string>
		<string>Roboto.ttf</string>
		<string>rubicon-icon-font.ttf</string>
		<string>Merriweather-Bold.otf</string>
		<string>Merriweather-Light.otf</string>
		<string>Merriweather-Regular.otf</string>
		<string>OpenSans-Bold.ttf</string>
		<string>OpenSans-Light.ttf</string>
		<string>OpenSans-Regular.ttf</string>
		<string>DroidKufi-Bold.ttf</string>
		<string>DroidKufi-Regular.ttf</string>
		<string>AntDesign.ttf</string>
		<string>Entypo.ttf</string>
		<string>EvilIcons.ttf</string>
		<string>Feather.ttf</string>
		<string>FontAwesome.ttf</string>
		<string>FontAwesome5_Brands.ttf</string>
		<string>FontAwesome5_Regular.ttf</string>
		<string>FontAwesome5_Solid.ttf</string>
		<string>Fontisto.ttf</string>
		<string>Foundation.ttf</string>
		<string>Ionicons.ttf</string>
		<string>MaterialCommunityIcons.ttf</string>
		<string>MaterialIcons.ttf</string>
		<string>Octicons.ttf</string>
		<string>SimpleLineIcons.ttf</string>
		<string>Zocial.ttf</string>
		<string>Nunito-Bold.ttf</string>
		<string>Nunito-Medium.ttf</string>
		<string>Nunito-Regular.ttf</string>
		<string>Nunito-Light.ttf</string>
	</array>
Other Info.plist values
The ePaper usually works with the key UIViewControllerBasedStatusBarAppearance set to NO
<key>UIViewControllerBasedStatusBarAppearance</key>
<false/>
If your app requires UIViewControllerBasedStatusBarAppearance to be YES ensure that your View Controller sets the Status bar style to .lightContent, as the default background color for the ePaper is black.
override var preferredStatusBarStyle: UIStatusBarStyle {
      return .lightContent
}
HTTP support
If your ePaper app needs to load resources from non-HTTPS domains ensure that the Info.plist allows arbitrary loads:
<key>NSAppTransportSecurity</key>
<dict>
    <key>NSAllowsArbitraryLoads</key>
    <true/>
    ...
</dict>
Code integration
Setup
Tecnavia provides also the couple "PAPER_SETUP" - "SERVER" which allows you to load the epaper for a specific publication.
Before displaying the ePaper View Controller (ex. during the your app setup), call the Newsmemory singleton to set the startup parameters.
- Import the following header file
...
#import <Newsmemory/Newsmemory.h>
...
-
Make the class that will control the ePaper implement the
NewsmemoryDelegateinterface (the below code shows how you could do it in theAppDelegate.h).IMPORTANT:make sure that the class has awindowproperty.
...
@interface AppDelegate : UIResponder <UIApplicationDelegate, NewsmemoryDelegate>
...
@property (nonatomic, strong) UIWindow *window;
...
- Before loading the ePaper view (e.g. you could put in your
didFinishLaunchingWithOptionsmethod in yourAppDelegate.m), set the publication parameters provided (i.e. PAPER_SETUP, SERVER and API_KEY) and set the delegate
...
- (BOOL)application:(UIApplication *)application didFinishLaunchingWithOptions:(NSDictionary *)launchOptions {
    ...
    [Newsmemory setPSetup:@"PAPER_SETUP"];
    [Newsmemory setServer:@"SERVER"];
    [Newsmemory setDelegate:self];
    //if provided set also the API key
    [Newsmemory setAPIKey:@"API_KEY"];

    return YES;
}
...
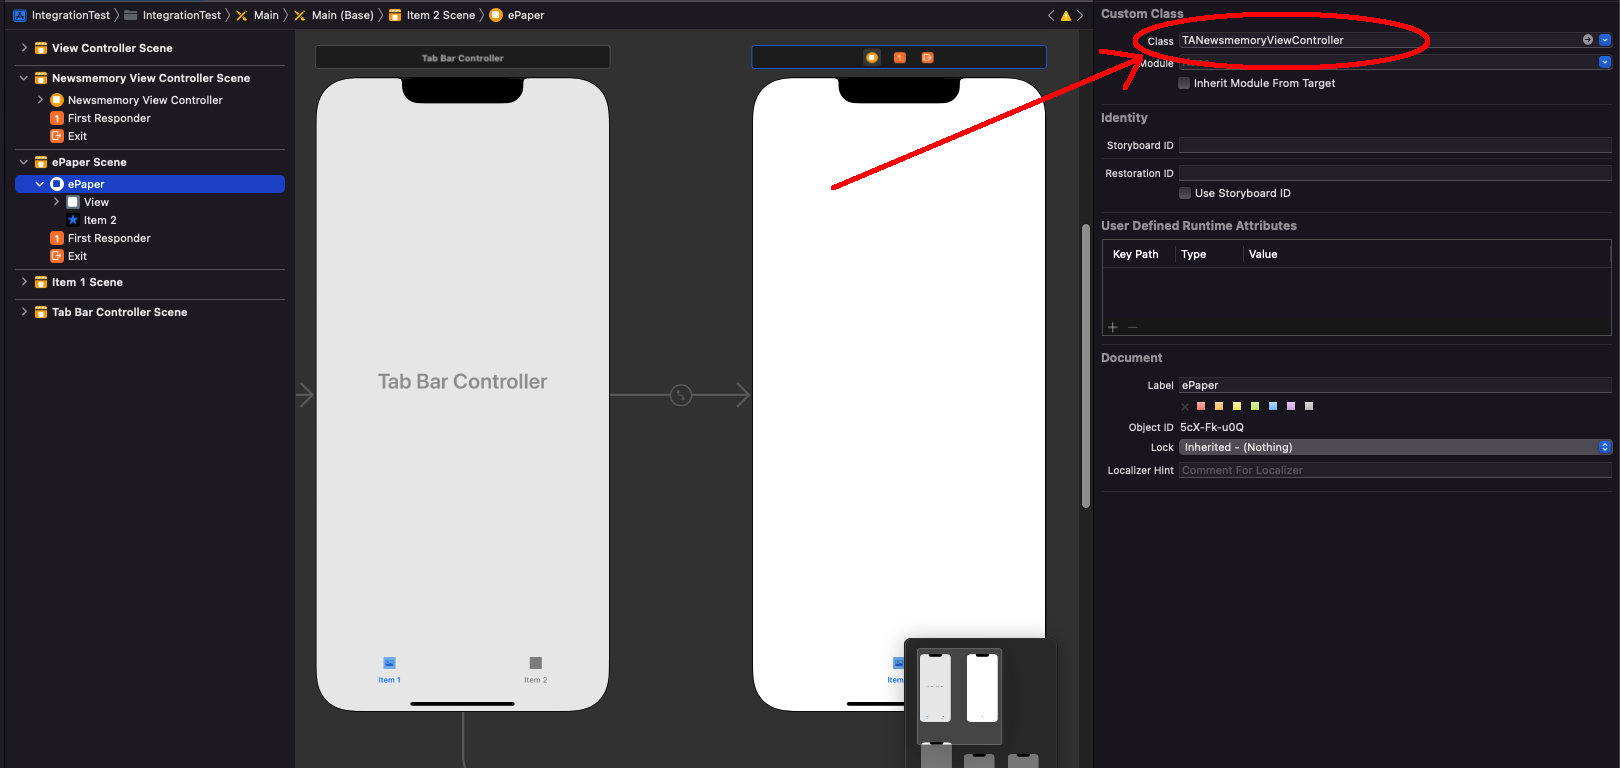
- Show the TANewsmemoryViewController
If you are using Storyboards you could simply create a ViewController element and set TANewsmemoryViewController as 'Class'
Swift integration
If you are using Swift in your app and you are using the use_frameworks! attribute you need to take additional steps:
- add the following lines to your
Podfile:
...
### PODS ###
...

static_libraries = ['NewsmemorySDK'] # <- static libraries names
# Make frameworks in the list static frameworks by overriding the static_framework?function to return true
pre_install do |installer|
  installer.pod_targets.each do |pod|
    if static_libraries.include?(pod.name)
      puts "Overriding the static_framework? method for #{pod.name}"
      def pod.static_framework?;
        true
      end
      def pod.build_type;
        Pod::BuildType.static_library
      end
    end
  end
end
-
run again
pod install -
Add to you project a
-Bridging-Header.hfile and add there the import of theNewsmemorymodule:
#import <Newsmemory/Newsmemory.h>
-
Remove the import of the
Newsmemorymodule from your.swiftfilesimport Newsmemory -
Go to
Project->Build Settings->Objective-C Bridging Headerand add the path to the bridging header file. The path should be relative to your project, similar to the way your Info.plist path is specified in Build Settings (see https://developer.apple.com/documentation/swift/importing-objective-c-into-swift for more details).
Dependencies
This SDK has been tested with Google-Mobile-Ads-SDK versions >= 9.6 and < 12.
Tecnavia does not guarantee that the SDK builds nor its stability if you use a higher version of the GMA SDK.
Available Newsmemory methods
| Method name | Type | Default | Description |
|---|---|---|---|
| setPSetup | NSString* | (required) | the configuration to load for a publication |
| setServer | NSString* | (required) | the Tecnavia endpoint for the publication |
| setAPIKey | NSString* | none | the API key to use the SDK at runtime |
| setToken | NSString* | none | the auto login token to pass the ePaper |
| setLockedOrientation | NSString* | none | the orientation the SDK should support, possible values (all, portrait, portrait_up, portrait_down, landscape, landscape_left, landscape_right) |
| setLockedOrientationDevice | NSString* | none | the device type that should respect the locked orientation setting (see setLockedOrientation). Possible values (phone, tablet). If not set, locked orientation (if set) will be applied to both phones and tablets. |
| setDelegate | delegate | none | pass the object that will implement the supported method callbacks |
| setNeedsCloseButton | BOOL | NO |
adds a button to the ePaper buttons bar to send to the enclosing app a message to close the ePaper |
| setNeedsSafeArea | BOOL | NO |
delegates to the SDK the handling of the device safe area |
| setDebugMode | BOOL | NO |
enables debug mode to increase logging and use development backend versions, it must be set to NO when building for Release |
| enableDebugger | BOOL | NO |
enables a visual debugger to monitor performances and use development backend versions, it must be set to NO when building for Release |
| setReferrer | NSString* | none | the referrer to pass to GA4 analytics |
| setExtraGA4Params | NSString* | none | querystring-like list of parameters to pass to GA4 analytics (e.g. "param1=value1¶m2=value2¶m3=value3") |
| setStartupParams | NSString* | none | querystring-like list of parameters to pass to the SDK to force the loading of a specific issue/edition (e.g. "issue=value1&edition=value2"), see Startup parameters section |
Startup parameters
Here a list of the supported startup parameters:
| Name | Format | Description |
|---|---|---|
| issue | YYYYMMDD | The issue to load at startup |
| selDate | YYYYMMDD | The issue to load at startup |
| date | YYYYMMDD | The issue to load at startup |
| edition | any | The edition to load at startup |
| editionStart | any | The edition to load at startup |
| goTo | any (e.g. A1) |
The page of the issue to load at startup |
| artid | number (e.g. 8) |
The Tecnavia id of ther article to load at startup (requires goTo to be set) |
Delegate Callbacks
| Method name | Params | Return value | Is synchronous? | Description |
|---|---|---|---|---|
| onNewsmemoryClose | none | none | NO |
Called when the user presses the button to close the ePaper see (setNeedsCloseButton method) |
| newsmemoryWillOpenURL | (NSString*)url | BOOL | YES |
This callback if called when the ePaper tries to open an URL, if this method returns NO the URL will be opened inside the Tecnavia ePaper solution, if the method returns YES the ePaper won't open the URL and the enclosing app should manage the opening itself. IMPORTANT: As this is a synchronous method if the decision can be made within 2 seconds the ePaper will open the URL internally. |
| onNewsmemoryTrackAction | (NSDictionary *)data | none | NO |
Each action/event in the app will cause this callback to be called. The data dictionary contains the info regarding the user action. This callback can be used to collect data and send it to the analytics platform your app uses. For more details about the data sent by the app see paragraph Tracking |
| onNewsmemoryReload | none | none | NO |
This callback is invoked when a JS bundle update takes place in the SDK |
| onNewsmemoryTokenExpired | none | none | YES |
This callback is invoked when the SDK login API call fails due to the expiration of the TOKEN. If this method returns NO the login process will be handled inside the Tecnavia ePaper solution, if the method returns YES the ePaper won't continue loading: the enclosing app should manage the login process itself and eventually relaunch the SDK. IMPORTANT: As this is a synchronous method if the decision can't be made within 2 seconds the ePaper will handle the login internally. |
Example:
- (void)onNewsmemoryClose {
    ...
}

- (BOOL)newsmemoryWillOpenURL:(NSString *)url {
    //TODO: handle the opening of the URL locally in your app
    return YES;
}

- (void)onNewsmemoryTrackAction:(NSDictionary *)data {
    ...
}

- (BOOL)onNewsmemoryTokenExpired {
    //TODO: handle the login process
    return YES;
}
Tracking
By implementing the callback onNewsmemoryTrackAction your app will receive data about user actions and events occurring inside the ePaper.
In the following table we will describe the format of the data:
| Key | Type | Value |
|---|---|---|
| trackType | NSString * | "screen" or "event" |
| data | NSDictionary * | (see below) |
Common data
| Key | Type | Value |
|---|---|---|
| paper | NSString * | the sanitized paper name, ex: usatoday |
| edition | NSString * | the edition currently open, ex: USA Today |
| issue | NSString * | the issue currently open, ex: 20230218 |
| page | NSString * | the page the user is currently on, ex: A1 |
| section | NSString * | the section the user is currently on, ex: World |
When article mode is open there are other values available:
| Key | Type | Value |
|---|---|---|
| title | NSString * | the title of the article the user is currently on |
| type | NSString * | the type of the article the user is currently on, ex: Editorial |
| mode | NSString * | the mode the user is using to read an article, text/graphic |
Screen specific data
A screen represents something that is displayed on the screen, such as an ePaper page or article.
The data dictionary can contain the following values:
| Key | Type | Value |
|---|---|---|
| screen | NSString * | an URL-like string containing all the info about what is shown onto screen. Ex: /iPhone/20230218/USA Today/scrolled/A1 |
| action | NSString * | the action associated to the screen, ex: scrolled |
When article mode is open there are other values available:
| Key | Type | Value |
|---|---|---|
| article_id | int | the Tecnavia id of the article, ex: 8 |
Event specific data
An event represents an action performed by the user on the ePaper, such as the activation of the Text-to-speech feature or the sharing of an article on Facebook.
The data dictionary can contain the following values:
| Key | Type | Value |
|---|---|---|
| action | NSString * | the event name, ex: tts_start |
| category | NSString * | the event category, ex: text_to_speech |
Keyboard support
On devices which support a physical or a virtual keyboard the SDK supports some shortcuts to navigate and interact with the ePaper.
Here a list of the supported keys:
Key groups
Some actions can be performed with more than one key, here the so-called key groups:
| Name | Keys |
|---|---|
LEFT |
J, 4, 4 (NUMPAD), LEFT ARROW |
RIGHT |
L, 6, 6 (NUMPAD), RIGHT ARROW |
UP |
I, 8, 8 (NUMPAD), UP ARROW |
DOWN |
K, 2, 2 (NUMPAD), DOWN ARROW |
PAGE_UP |
N, 9, 9 (NUMPAD), PAGE UP |
PAGE_DOWN |
M, 3, 3 (NUMPAD), PAGE DOWN |
OPEN |
O, 5, 5 (NUMPAD), . (NUMPAD) |
SELECT |
O, 5, ENTER, 5 (NUMPAD), ENTER (NUMPAD) |
SUBMIT |
ENTER, ENTER (NUMPAD) |
HOME |
7, 7 (NUMPAD), HOME |
END |
1, 1 (NUMPAD), END |
LESS |
-, - (NUMPAD) |
MORE |
+, + (NUMPAD) |
Menu items
| Key(s) or Key Group | Behavior |
|---|---|
ENTER |
Press menu item |
ESC |
Blur menu item |
I |
Open index mode |
LEFT/RIGHT group, TAB |
Navigate thru items |
P, . (NUMPAD) |
Open thumbnails mode |
Search |
Open search mode |
Space |
Toggle fit mode |
T |
Open accessibility mode |
Graphic mode
| Key(s) or Key Group | Behavior |
|---|---|
B |
Open browse mode |
OPEN group |
Open first article |
LEFT/RIGHT/PAGE_UP/PAGE_DOWN groups |
Navigate thru page |
UP/DOWN groups |
Move vertically in the page |
MORE/LESS groups |
Zoom in/out in the page |
HOME group |
Move to previous section |
END group |
Move to next section |
Index mode
| Key(s) or Key Group | Behavior |
|---|---|
CLOSE group |
Close index mode |
SPACE group |
Toggle index mode fullscreen mode |
Index mode (2nd level)
| Key(s) or Key Group | Behavior |
|---|---|
CLOSE group |
Close index mode |
SPACE group |
Toggle index mode fullscreen mode |
LEFT/RIGHT group |
Navigate thru sections |
OPEN group |
Open 1st level index |
Article mode
| Key(s) or Key Group | Behavior |
|---|---|
CLOSE group |
Close article mode (if search active, closes search) |
UP/DOWN group |
Scroll up/down the article |
LEFT/RIGHT group |
Navigate thru articles |
PAGE_UP/PAGE_DOWN group |
Go to the first article of previous/next page |
OPEN group |
Open 2nd level index |
MORE/LESS groups |
Zoom in/out in the article |
HOME group |
Move to previous article slug |
END group |
Move to next article slug |
SPACE group |
Toggle article mode fullscreen mode |
P |
|
S |
Share |
V |
Toggle text-to-speech |
SELECT group |
Select item (accessibility mode) |
Thumbnail mode
| Key(s) or Key Group | Behavior |
|---|---|
LEFT/RIGHT groups |
Navigate thru thumbnails |
SELECT group |
Open highlighted page |
Search mode
| Key(s) or Key Group | Behavior |
|---|---|
CLOSE group |
Close search mode |
Editions page
| Key(s) or Key Group | Behavior |
|---|---|
CLOSE group |
Close editions page |
Troubleshooting
- error build: Library not found for -l<LIBRARY NAME> at build stage
Check that you copied the SDK folder in the same folder of your .xcodeproj file.
Check that you imported the .xcconfig file in your project Configurations settings
- [native] No bundle URL present. Make sure you're running a packager server or have included a .jsbundle file in your application bundle. in the logs and crash at runtime
Ensure that the you imported the file Newsmemory.js within the SDK resources (see Installation step 4).
- rpath/libswiftCore.dylib not loaded at runtime
This might mean that xCode is not including the required Swift packages. To fix simply add a blank .swift file and let xCode generate the corresponding bridging header.
- CocoaPods could not find compatible versions for pod "NewsmemorySDK" when running pod install
[!] CocoaPods could not find compatible versions for pod "NewsmemorySDK":
  In Podfile:
    NewsmemorySDK (= 3.32.04)

None of your spec sources contain a spec satisfying the dependency: `NewsmemorySDK (= 3.32.04)`.

You have either:
 * out-of-date source repos which you can update with `pod repo update` or with `pod install --repo-update`.
 * mistyped the name or version.
 * not added the source repo that hosts the Podspec to your Podfile.
Simply run pod install --repo-update
Authors
- Nicolò Aquilini, iOS Software developer, Tecnavia
- Andrea Mauri, Android Software developer, Tecnavia